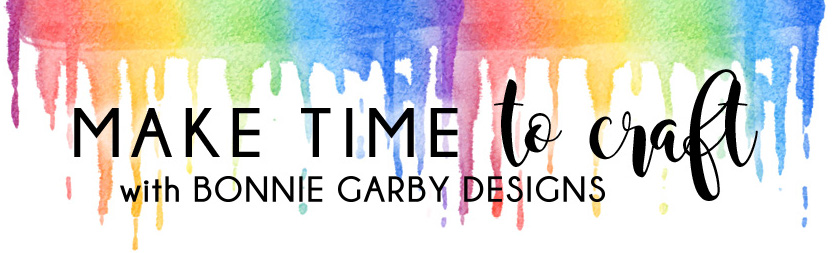
Hi friends. Today I have a summer themed mini album to share that I made using some of each of the different ribbon styles in the June Ribbon Club Assortment from Really Reasonable Ribbon along with some Burlap String for the tops of my tags.
This is my first attempt at a mini album with this sort of binding, so I would love any tips you can give me in the comments section.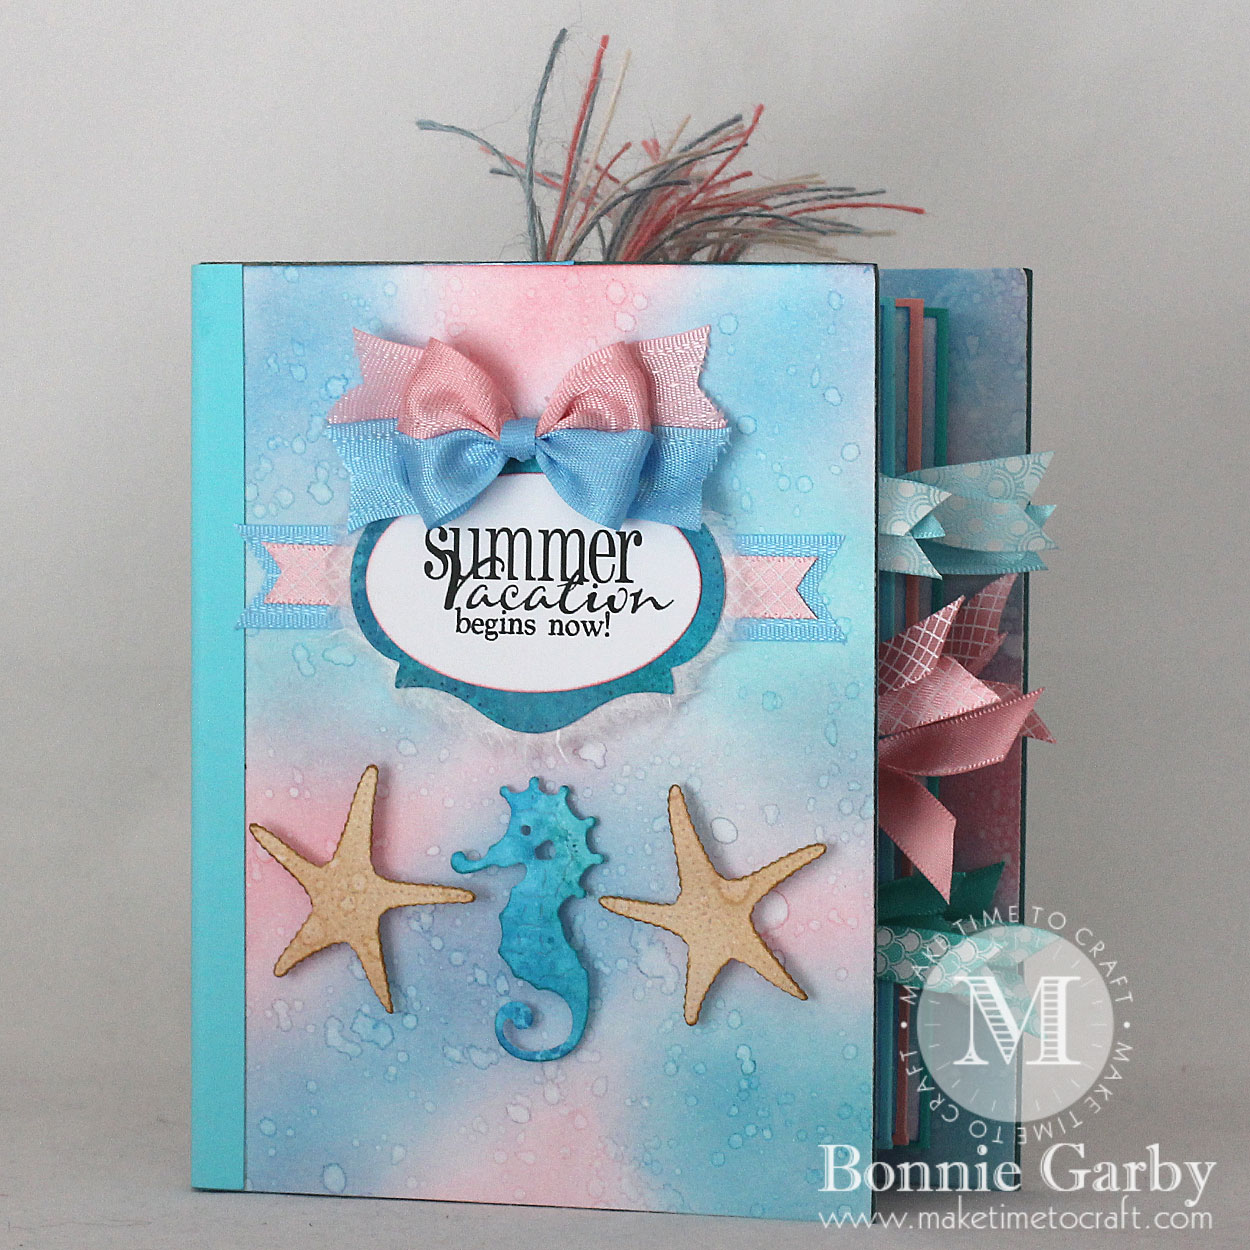

The June Ribbon Club Assortment contains 9 styles and a total of 18 yards of ribbon. Each monthly assortment is a color or holiday themed collection of ribbon. What a fun way to build your ribbon stash and try new ribbon styles.
So, this is my first attempt at a mini album with this type of binding and overall, I’m pretty pleased with the results. For those of you with mini album experience, I would love some feedback. I will be posting some questions below as well on places where I had some problems.
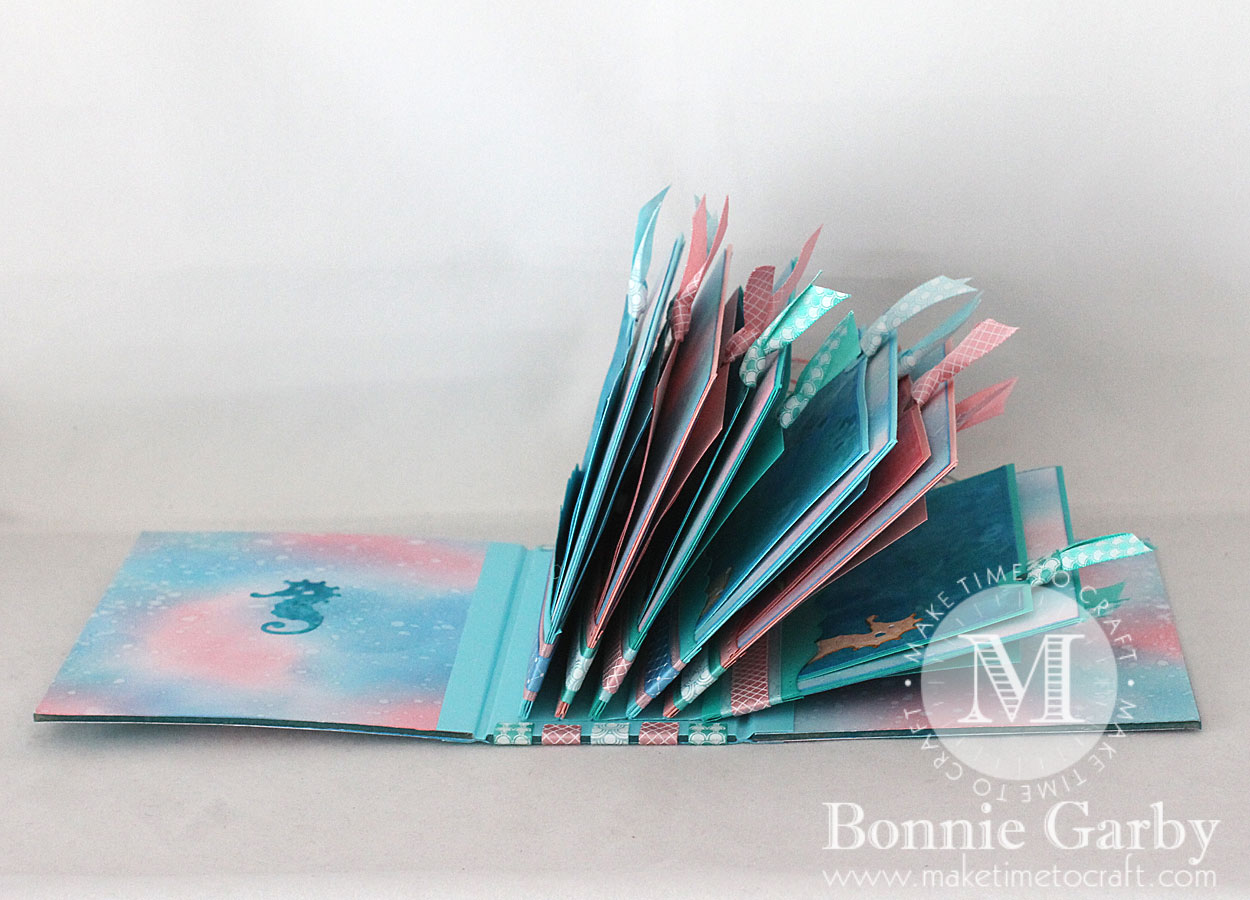
You can see on the photo above that I used a variety of ribbons on the book binding for a colorful touch. I then added a little summer saying near the top of the binding. As you can see in the photo below, I had added the pages before I decided to add the ribbon to the outer book binding. Next time I will add the ribbon first and then it will be tucked under where the pages attach to the binding.
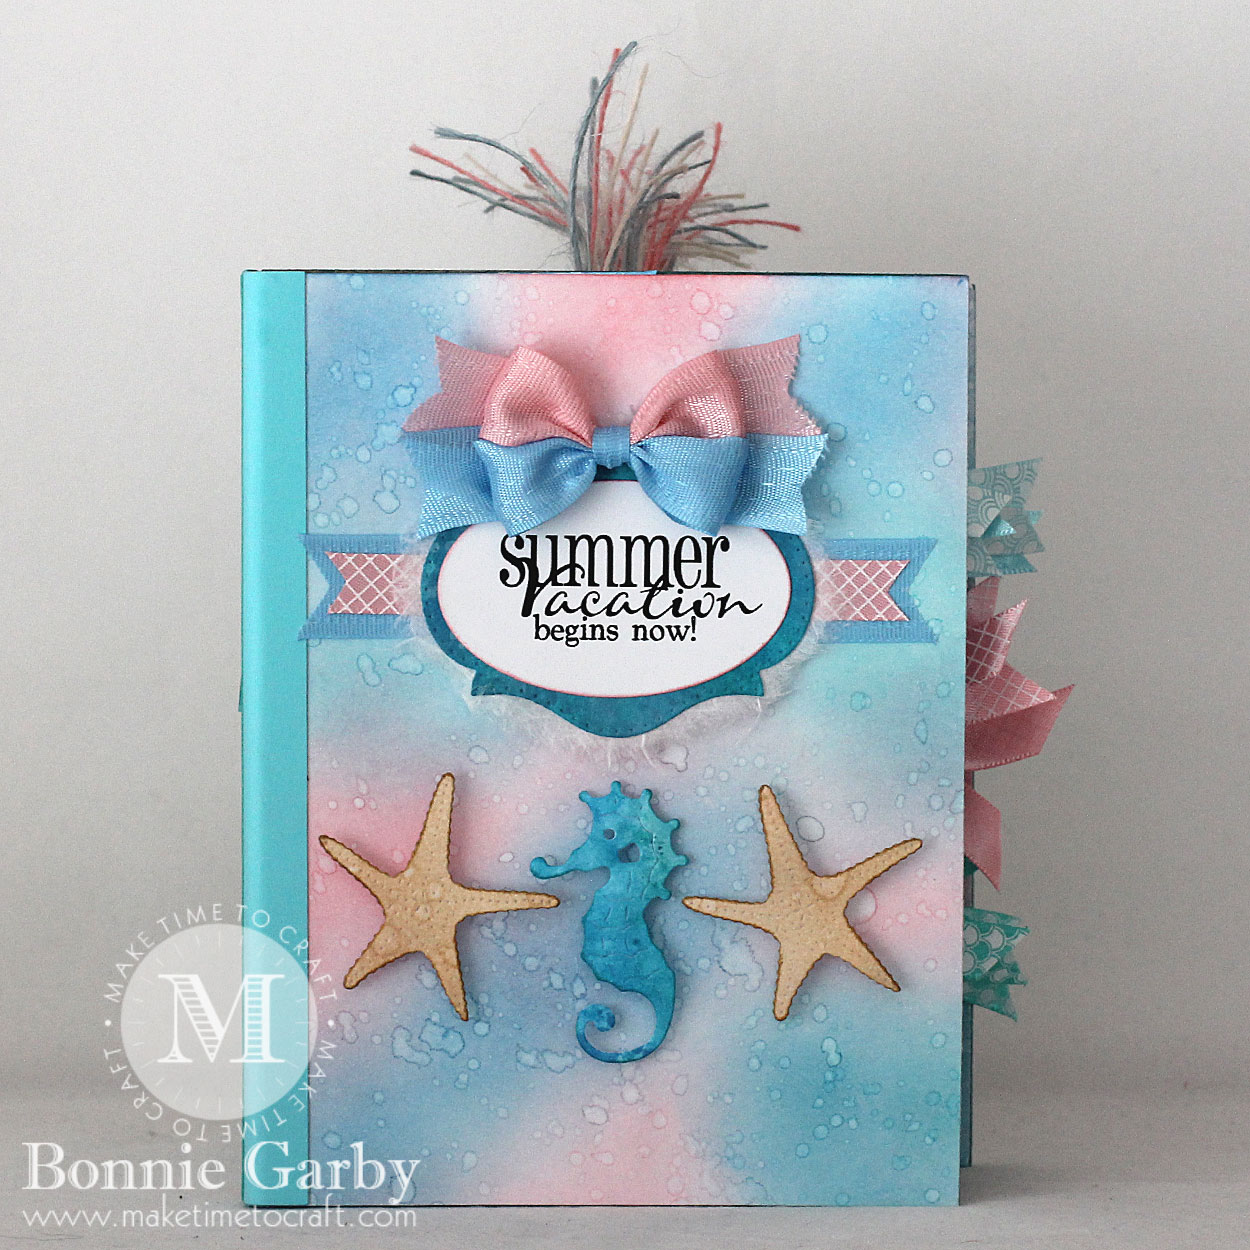
Of course I didn’t have any design paper in the colors I want. I have about 300 pounds of design paper, but I never have what I’m looking for – perhaps a slight exaggeration, but you know what I mean! So, I pulled out my Distress Ink pads and made some paper in the colors I wanted. I love the look, but I have to caution you that it was a LOT of work, so think hard before you set out on this path with making your own design paper…
Since it was my first album with this type of binding, I tried to go with the easy way on many of the steps. I did not completely cover my chipboard covers – meaning wrapping the paper around to cover the edges. I just cut paper the size of the front, back and binding and glued it on. I inked the sides of the chipboard, but I’m not really liking that too much, so I will do it differently next time.
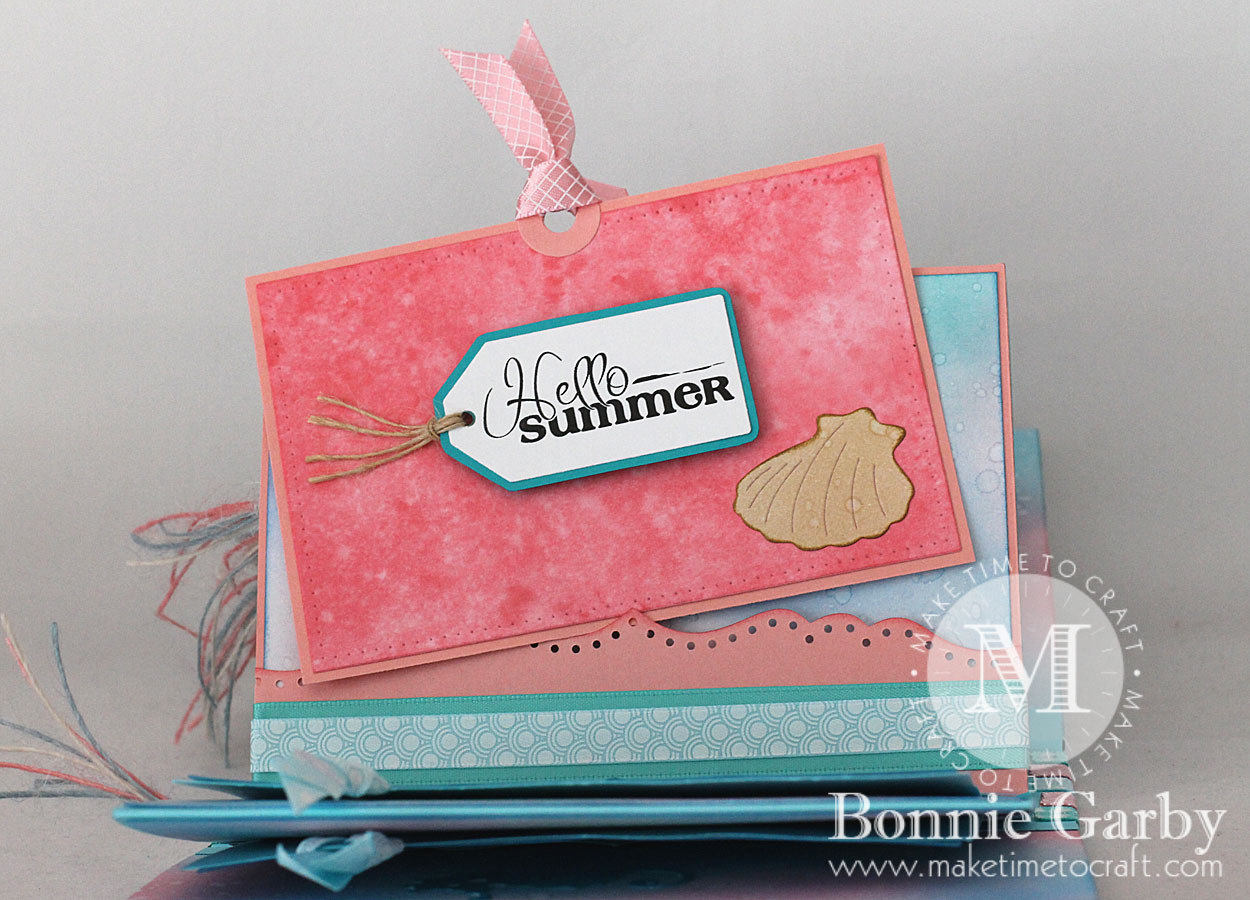
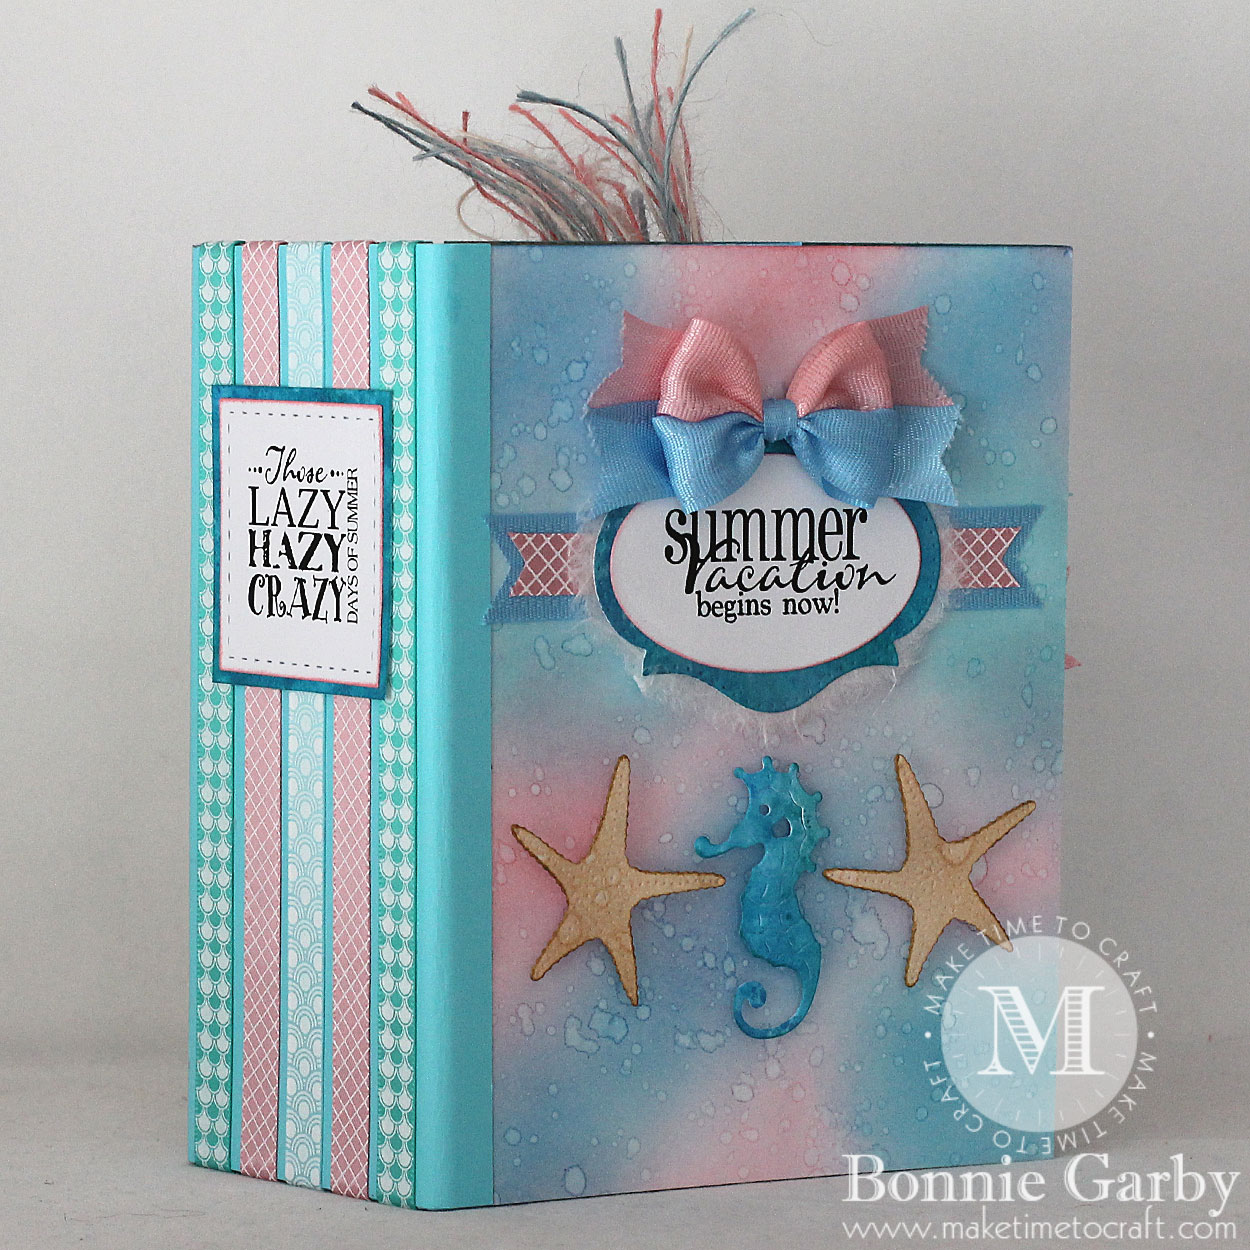
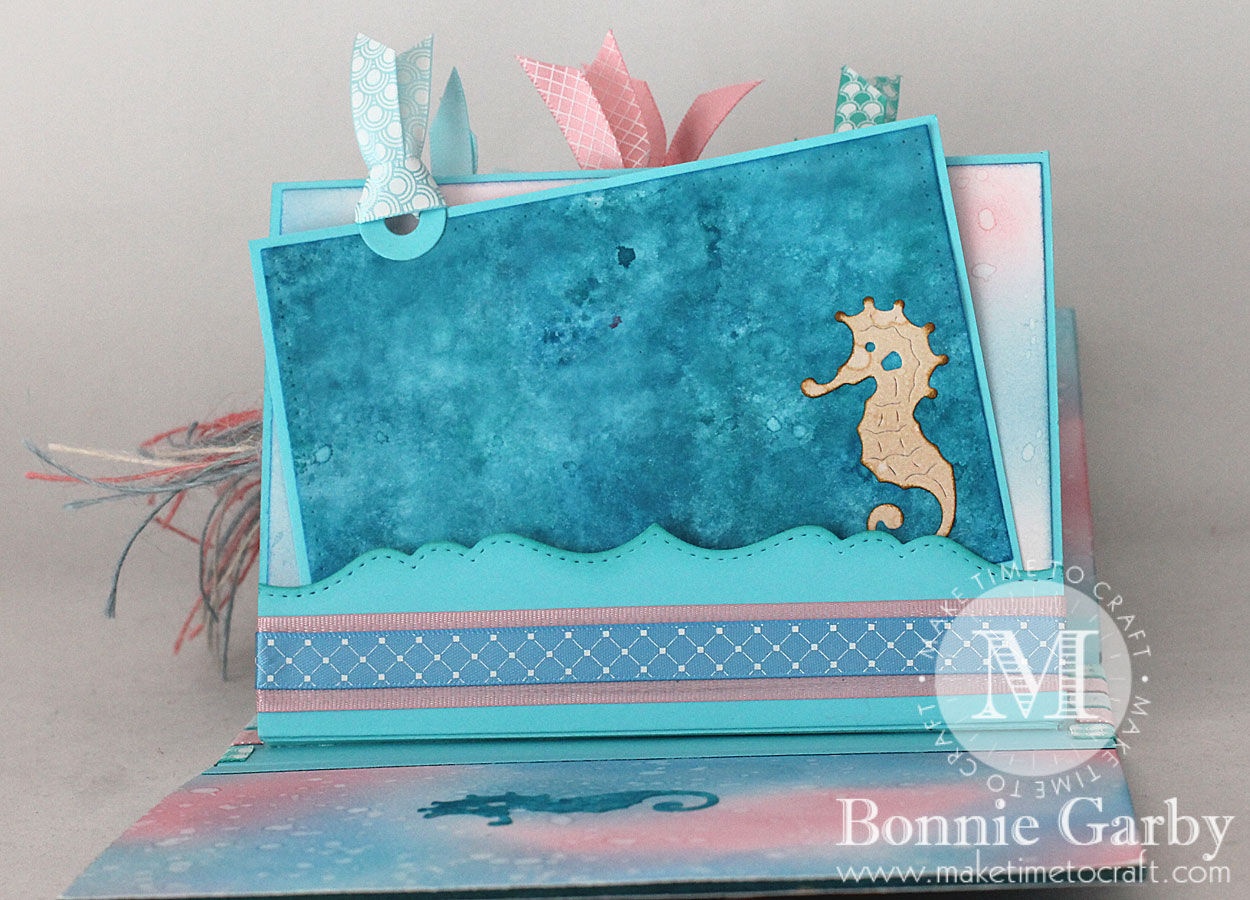
I was also pretty repetitive on the pages. All the pages were folded the same way with slightly different edgings. I also made all the pull-outs and tags the same shape and changed up the colors and the small beach themed embellishments for a little variety.
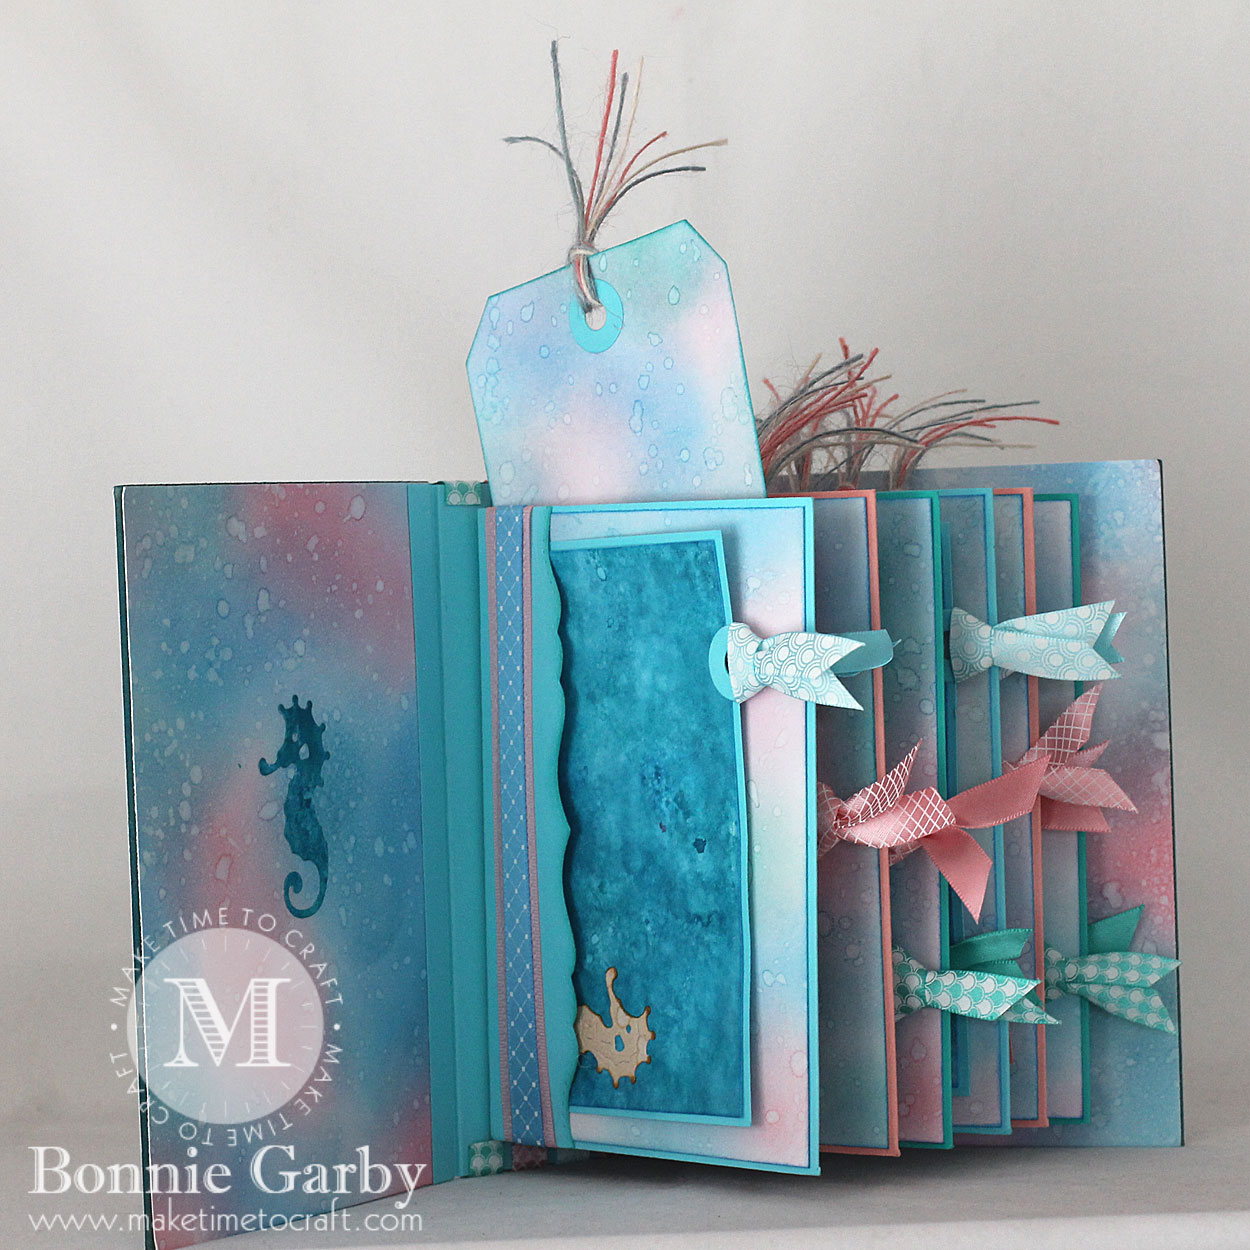 I used little snippets of all the 3/8″ ribbons from the June Ribbon Club Assortment on the pull-outs in the pages. I did stagger where I added the holes on these pull-outs so I would not have too much ribbon bulk in one spot.
For the tops of the tags that will slide in from the top, I used ivory, pink and light blue Burlap String which matched the ribbons very nicely.
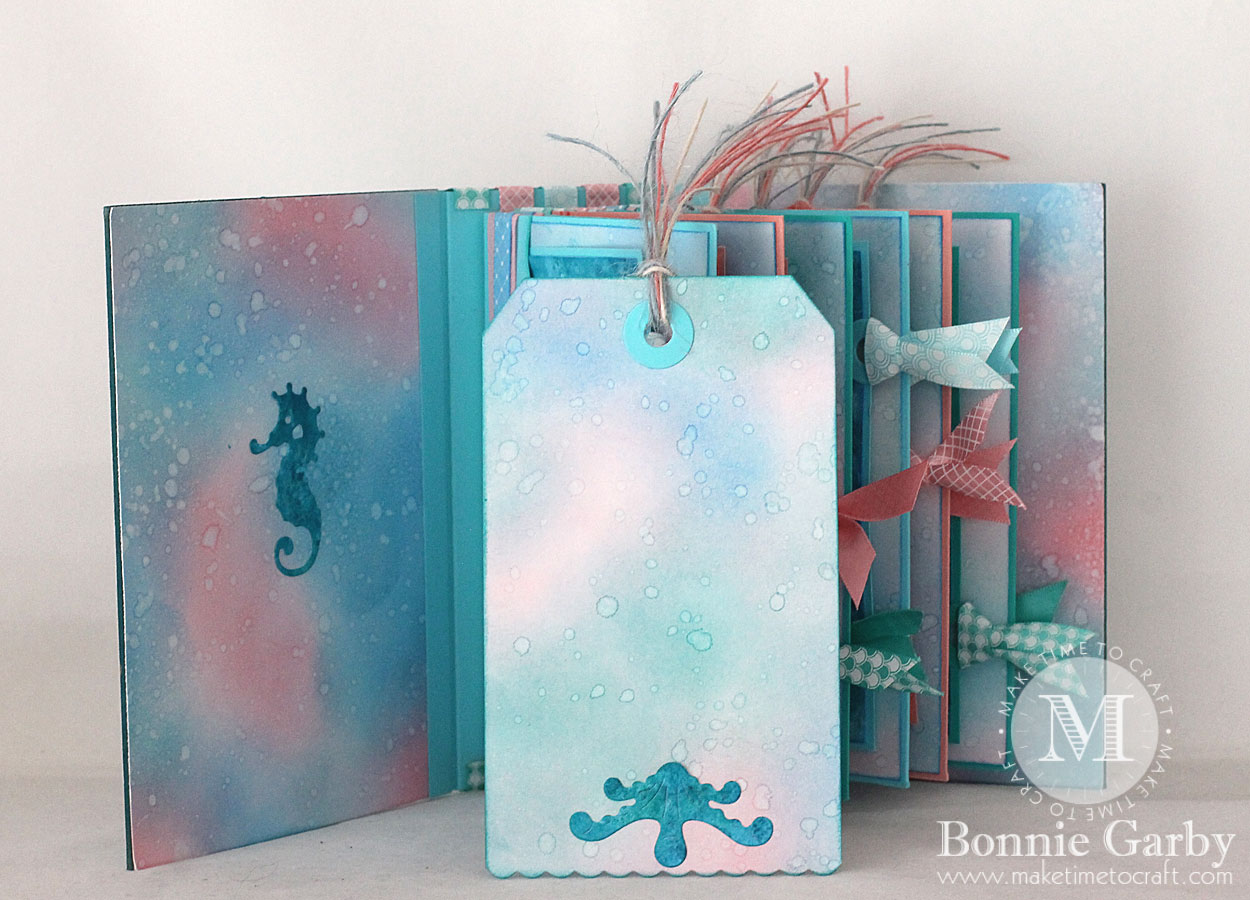 I also added some bands of ribbon on each page near the binding of the book to add some additional interest and color. You can probably see that a little better a few photos above this one.
Okay, so here are my questions:
1. Do you normally leave a little space when attaching your pages to a hidden hinge type binding? I think I made mine a little too snug as the pages won’t lay over. I originally thought it was because of the ribbon I added near the binding, but on closer inspection, it seems to be because I attached the pages too tightly.
2. What type/types of adhesive do you use? I am very impressed with Scor-Tape for attaching the binding mechanism. I think a wet glue is best though for adding the decorative paper to the chipboard for the cover. I rushed this one and just used my Scotch ATG.
3. How many pages is too many? I did 6 on this album with a 3/8″ space between the pages. The 3/8″ seems fine, but the album is 2-3/4″ thick. It 6 pages just too many?
4. How do you decide how much bigger than the pages to make the chipboard cover?
5. Any other tips and tricks for making things easier and nicer looking?
I topped off the front of my mini album with a pretty bi-color bow made on my Bow-it-All V3.0 using Peony and Copin Blue Delicate Stitched Satin from the June Ribbon club Assortment from Really Reasonable Ribbon. I also ran some layered ribbon across the center under the name plate.
For a video tutorial on how I created this pretty bi-color bow, please click HERE.
 I’m entering my mini-album in the following challenges:
613 Avenue Create #198 – Anything Goes
Word Art Wednesday #286/287 – Anything Goes
The Corrosive Challenge #6 – Anything Goes
Allsorts Challenge #419 – Use at least 2 dies
Crafting with Friends #45 – Anything Goes
Crafty Catz #374 – Anything Goes with Punches or Dies
Creative Fingers #132 – Anything Goes
Jo’s Scrap Shack FFC #192 – Anything Goes
Simply Create Too #128 – Summer Fun
Scrapy Land #67 – Anything Goes with dies
Die Cut Divas – Summer Fun
Aud Sentiments – Summer with a Sentiment
Crafting with an Attitude #28 – Anything Goes
Crafty Girls Creations #37 – Anything Goes
Crafty Creations #343 – Anything Goes
The Crafty Addicts #37 – Anything Goes with option of Die Cuts
Inspiration Destination #129 – Anything Goes
TTCRD – Anything Goes
Supplies
Ribbon: Really Reasonable Ribbon June Ribbon Club Assortment, Burlap String
Digital Sentiments: Create with TLC
Dies: Cheery Lynn Designs LSC1 Square Stitch & Cut Silver, XM7 Oval, XL20 Pierced Stacker 2, B569 Curved Border
, Rectangle Pierce & Cut Lge, B279 Sand Dollar and Starfish, CABD47 Sea; Spellbinders S4-725 Shapeabilities Shortie Tags
Ink: Distress Ink Spun Sugar, Worn Lipstick, Tumbled Glass, Broken China, Peacock Feathers, Salty Ocean, Old Paper, Antique Linen, Tea Dye, Tattered Rose, Brushed Corduroy
Adhesives: Scor-Tape, Scotch Advanced Tape Glider, Designer Dries Clear Adhesive
, E6000
, Scotch Quick Drying Tacky Glue
Bow-it-All V3.0
White Mulberry Paper
Chipboard
Tyvek
Sponge Daubers and mister

Wow! What a gorgeous album-love all those yummy colors, ribbons & dies-thanks for joining us at Die Cut Diva’s this month!
This is beautiful!! I love the colors, ribbons, embellishments and everything you’ve done. It looks like you had a wonderful time creating it as well. I’m by far not an expert on creating albums but I know what I like and I really like this. Thank you for sharing and for your video on the bow.
Thanks so much for your sweet comment Christine. I really did enjoy making it. I’m weird because I really like the construction part of making the album and the different types of folded pages, etc. Will definitely be making more albums, so I hope you’ll stop back and visit again soon. Happy crafting!
wow! what a gorgeous make. it is definitely a labour of love but well worth it. it would make a fabulous gift for anybody. thank you for sharing it with us at TTCRD and good luck, Theresa DT xx
Thanks so much for the sweet comment Theresa and thanks for stopping by.
Wow! That’s your first album? I am impressed. You did an excellent job. I like scor tape when fixing in my pages. Did you angle the tabs with the hidden hinged? If you cut them at an angle the pages fit right in. Go to Paper Phenomenon. Kathy is the idea behind the hidden hinge and since I’ve been following her, my pages lie flat.
I love the colors you did your album in. Thanks for joining us at Crafty Creations.
Ciao and continue the great work! Lisa
Thanks so much for the kind words Lisa. I also used Scor-tape to attach the pages to the binding AND to attach the binding to the cover and it worked really well. I did not angle the pages or the binding ‘fins’, but I did cut the binding piece 1/8″ smaller than the page opening, so that was fine. I just feel like if I had not ‘seated’ the pages so completely, they would fall better. I’m not sure if that is clear. I pushed the pages on to the binding ‘fin’ as far as they would go. I might try leaving like a 1/16″ gap at the bottom of the binding fin on the next one. I think it might ease things a little and allow the pages to move more freely. Thanks too for the tip for Paper Phenomenon. I will take a look. I watched so many YouTube videos I can’t remember who I learned what from. hahaha
I love this album. The colors are perfect and I love the tags! I hope to copy this next summer. Keep up the great work.
Thanks so much Nancy. I’m so glad you like my mini album. I’m honored that you like it so much that you would like to make a similar album. I hope you do! Happy crafting.
This is stunning!! I do so love seeing your creations they are always so inspiring! I cannot help with any of the questions as this is not something that I have done myself – but those patterned papers were certainly worth the effort I think!
Thanks for sharing over at Aud Sentiments and we hope to see you again 🙂
Hugz Tinz
Thanks so much Tina. I’m so glad you like my mini and the Distress paper. I love to make the Distress Ink paper and it always turns out so pretty. Happy crafting!
Of course I had to come see this gorgeous project, too, Bonnie! Again, your colors just draw me in and you have done an amazing job with this book! Love it to bits! Thank you, too, for sharing it with us at Scrapy Land! Hugs!
Gorgeous creation, thanks for joining Allsorts challenge, good luck.
Happy crafting
Tracy x
Fabulous die cuts and colours and lovely creation!
Thank you for sharing at Allsorts, welcome again;-))m
wow very nice. Thanks for joining us at The Crafty Addicts.
Bye, Groetjes van Ine (DT)
https://creaine-cards.blogspot.nl/
WOW, Lots of work went into this. Beautiful colors and elements. So glad you joined us at Die Cut Divas
Congratulations you are one of this week’s Top Rockers at 613 Avenue Create – don’t forget to pick up your badge from the Top Rocker page.
Thanks so much Sheryl. It’s such an honor to be selected as one of your Top Rockers!! Thanks for letting me know and happy crafting!
This is such a beautiful project. Thanks so much for sharing your creation with us over at the Crafty Creations Challenges Blog.
Kristina DT
Crafty Creations Challenges Blog
Cards by Kristina
Great album! Thank you for blessing us with your entry to the WORD ART WEDNESDAY challenge. Please join us to a new challenge starting 6/21/17. Leaving you the encouragement found in Psalms 16:8 (NIV) which says: “I keep my eyes always on the LORD. With him at my right hand, I will not be shaken.”
JO ANN
https://jatterburycreations.blogspot.com
Absolutely Beautiful! Love the pastel colors. Thank you for joining us at Simply Create Too. Cindy (DT)
One suggestion to improve your tutorials and really help us to recreate your project is to also post the measurements. Like this:
Cover outside : 6 x 12”
Score at 4, 6, 8
Or whatever the measurements are. Very helpful.
Nice work.